


Using Ideanote with PowerBI
This guide shows you how you can configure Ideanote as a data source in PowerBI, where you’ll be able to get your ideas, and their activities.
Setting up Ideanote as a data source inside PowerBI
1) To get started, you will need to create an API token on the Ideanote platform, unless you already have one. On your Workspace:
1.1) Click ‘Settings’
1.2) Click ‘Account’
1.3) Click ‘API Tokens’
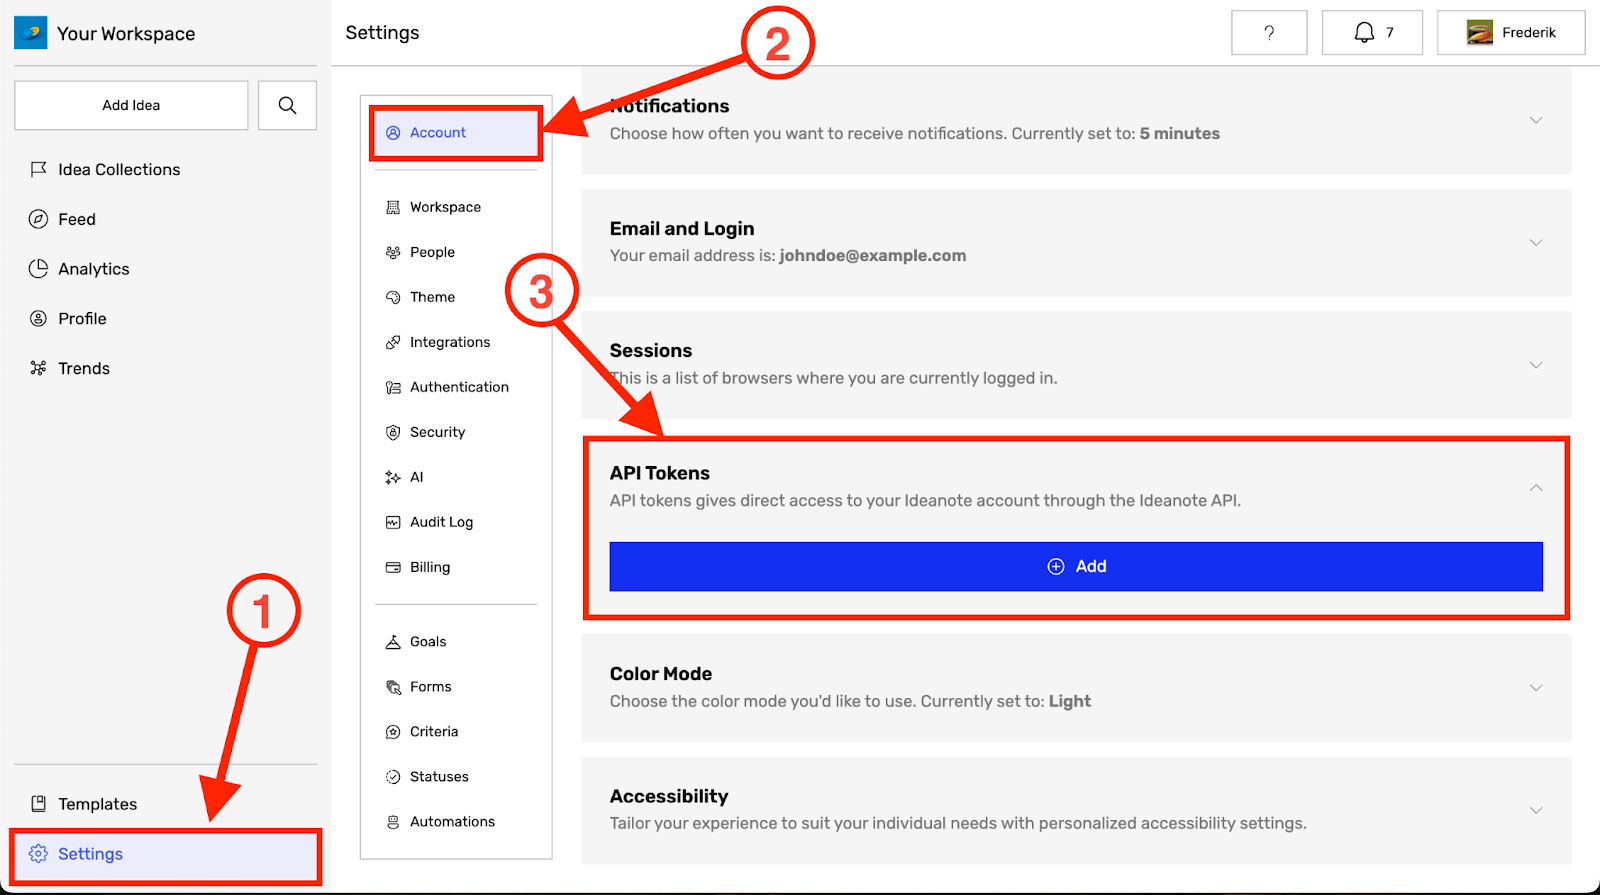
Note: You can also instead use the following direct link, but replace yourworkspace with your actual subdomain: https://yourworkspace.ideanote.io/settings/account#api-tokens
1.4) Click ‘Add’ if you don’t already have an API token.
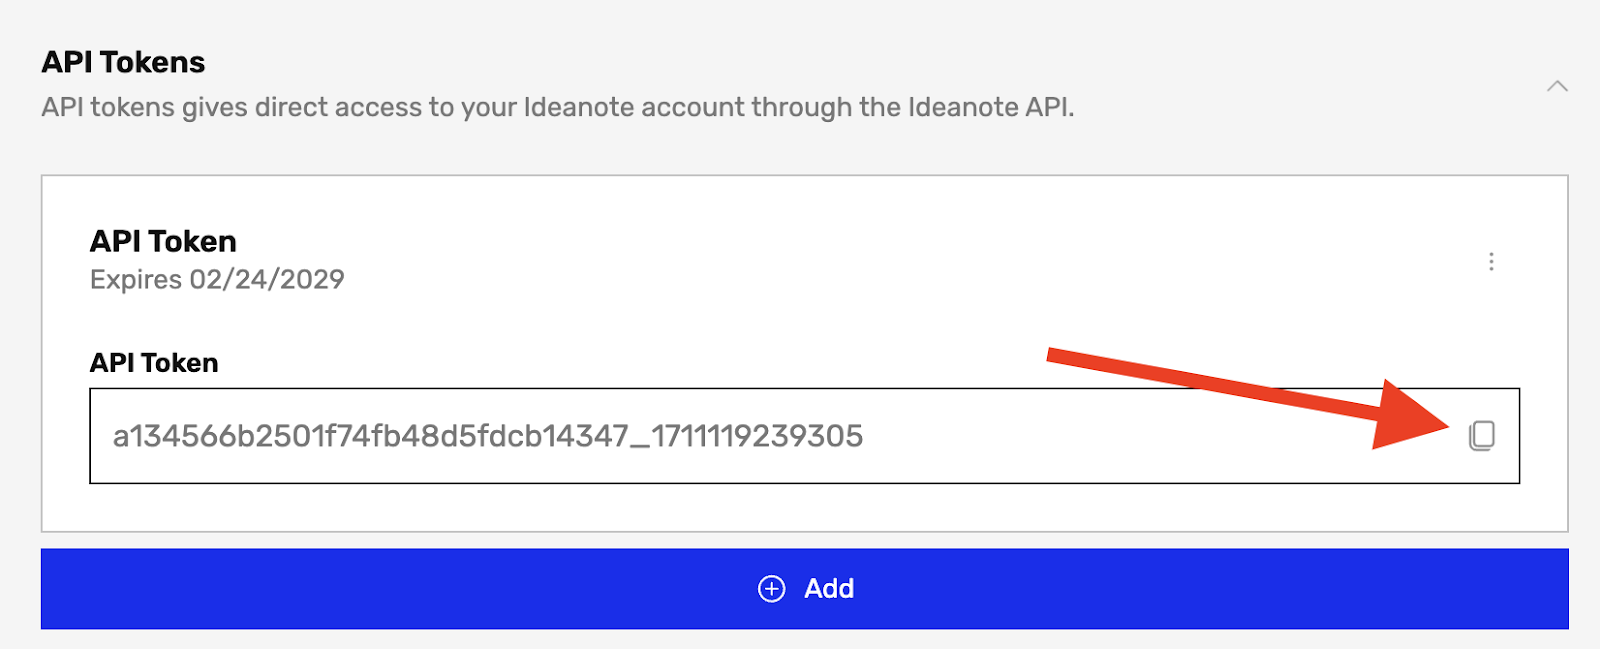
1.5) Copy the API token by clicking on the ‘copy’ icon, or by copying the text manually.
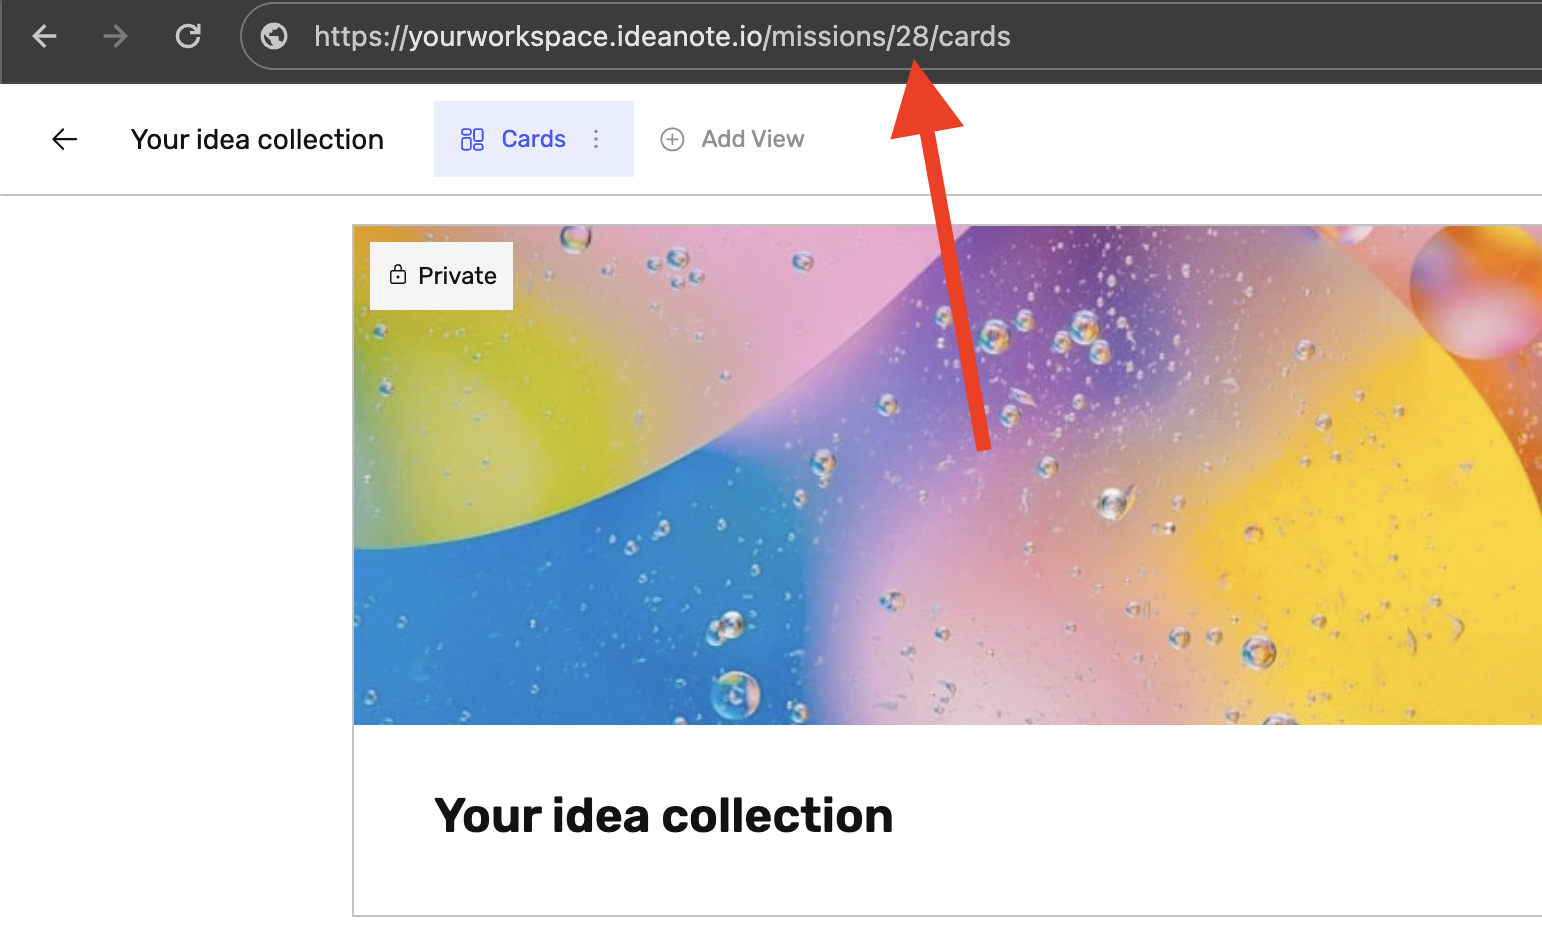
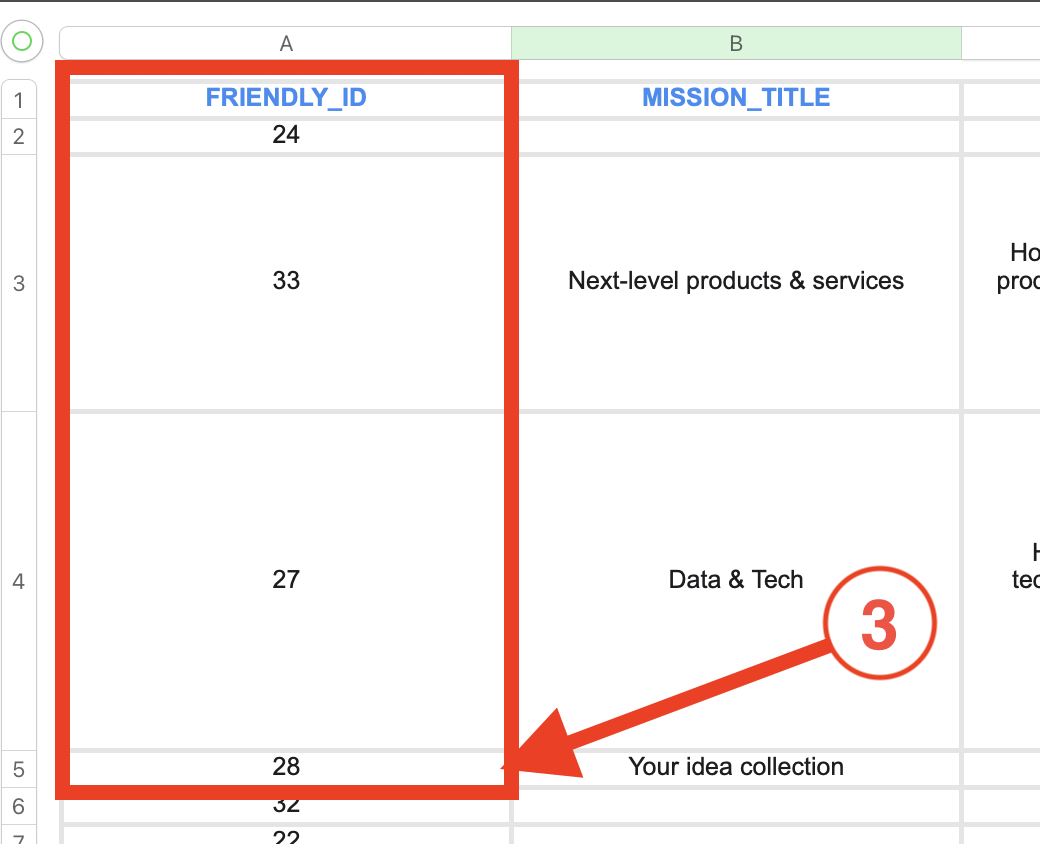
2) You will also need to know the ID of the idea collection to use as a data source. The easiest way to do so is by navigating to the idea collection and extracting the ID from the URL. The ID will be the digits following the /missions/ part of the URL. For example, in the URL https://yourworkspace.ideanote.io/missions/28/cards, 28 will be the ID.
Note: Alternatively, you can also get the ID by extracting an Excel file of all of your idea collections from the ‘Home’ page of your Workspace, and finding the ID in the FRIENDLY_ID column.
2) If you already know the ID from the URL, you can just proceed to step 3. Otherwise, here are full instructions to get it from an Excel file. From the ‘Home’ page (the entrypoint of your Workspace):
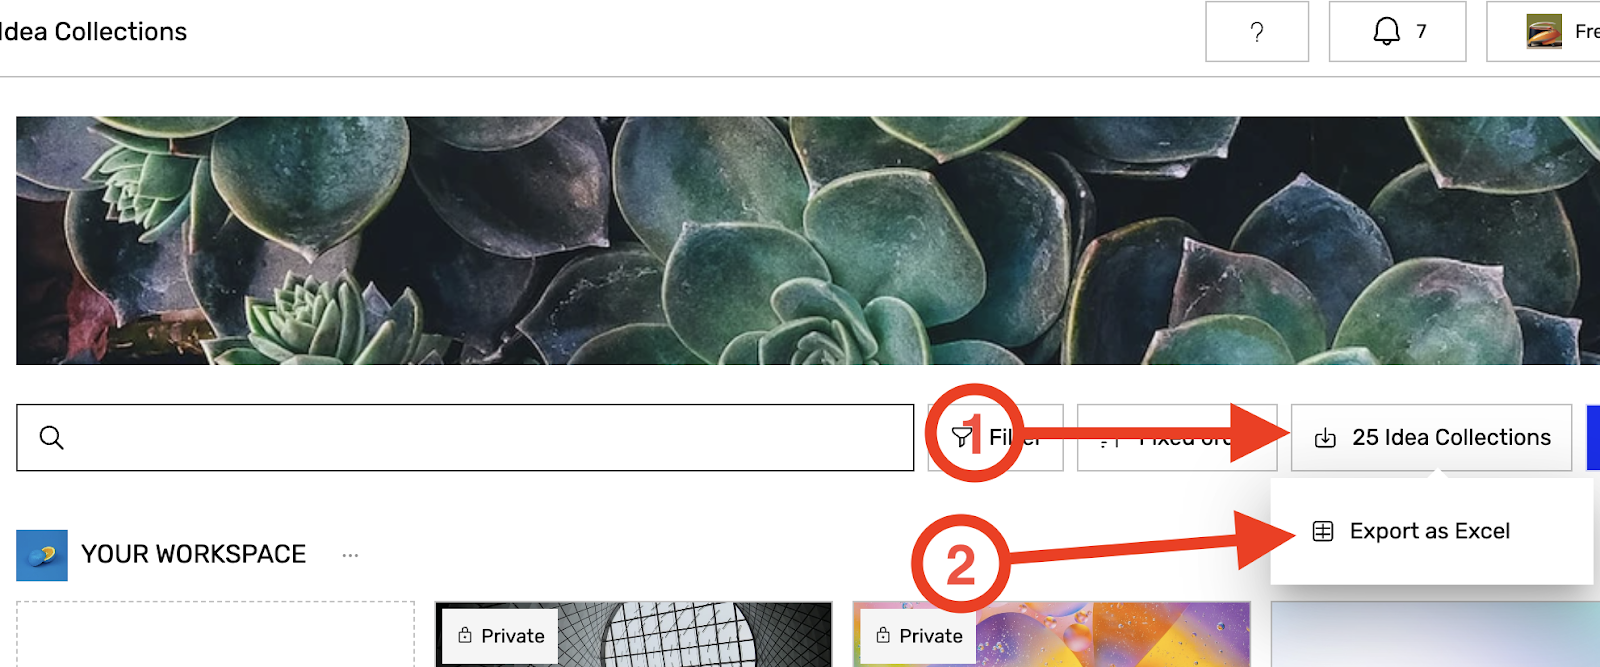
2.1) Click the button next to ‘Add’ in the filter toolbar that shows the amount of idea collections
2.2) Click ‘Export as Excel’ in the dropdown that appears.
2.3) Open the Excel file, and look for your idea collection and extract its ID from the FRIENDLY_ID column.
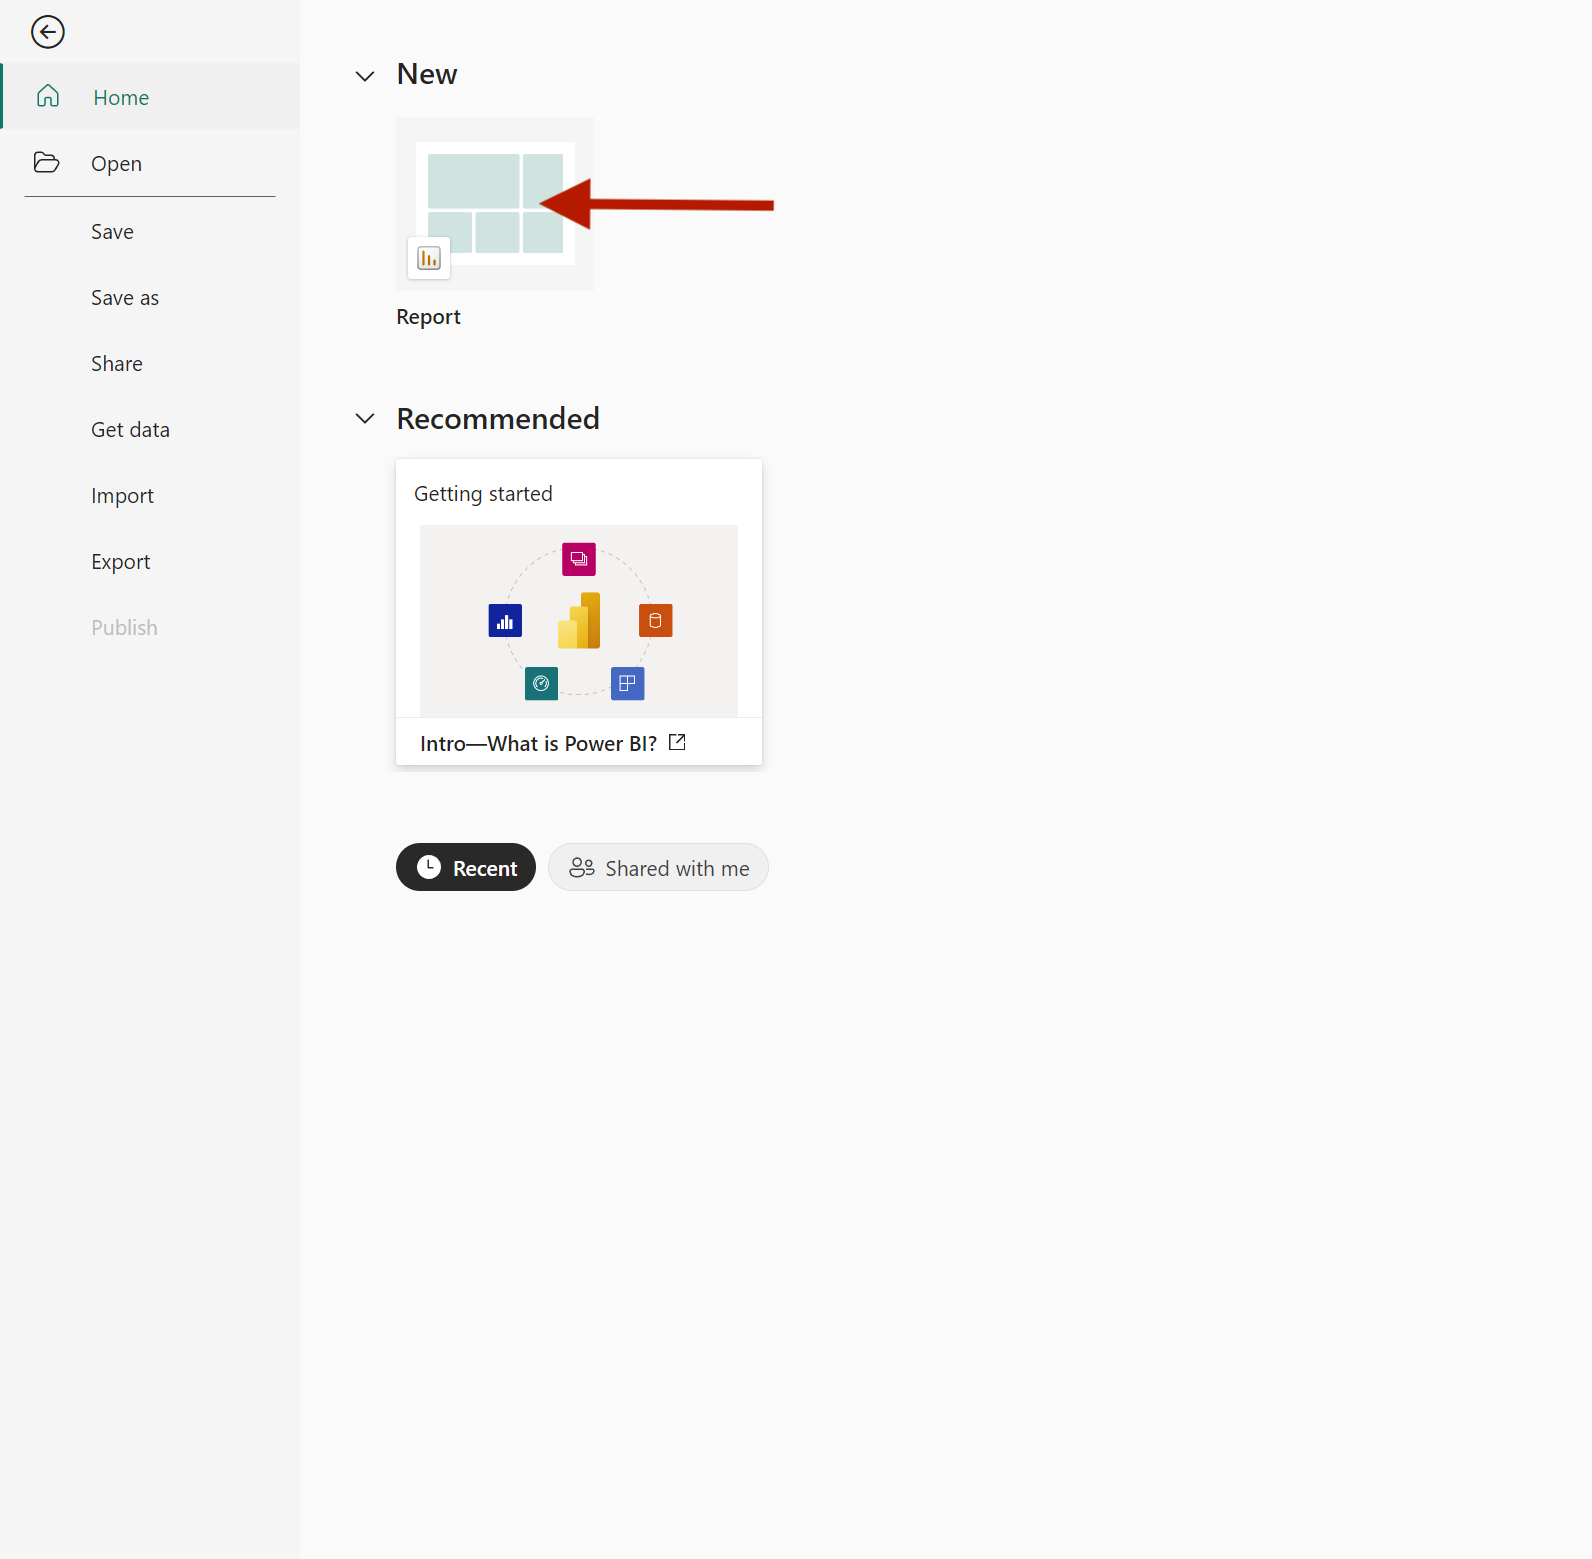
3) Inside PowerBI, open the report you want to connect Ideanote to, or create a new one via the ‘Report’ button under the ‘New’ heading on the ‘Home’ tab
4) In your report:
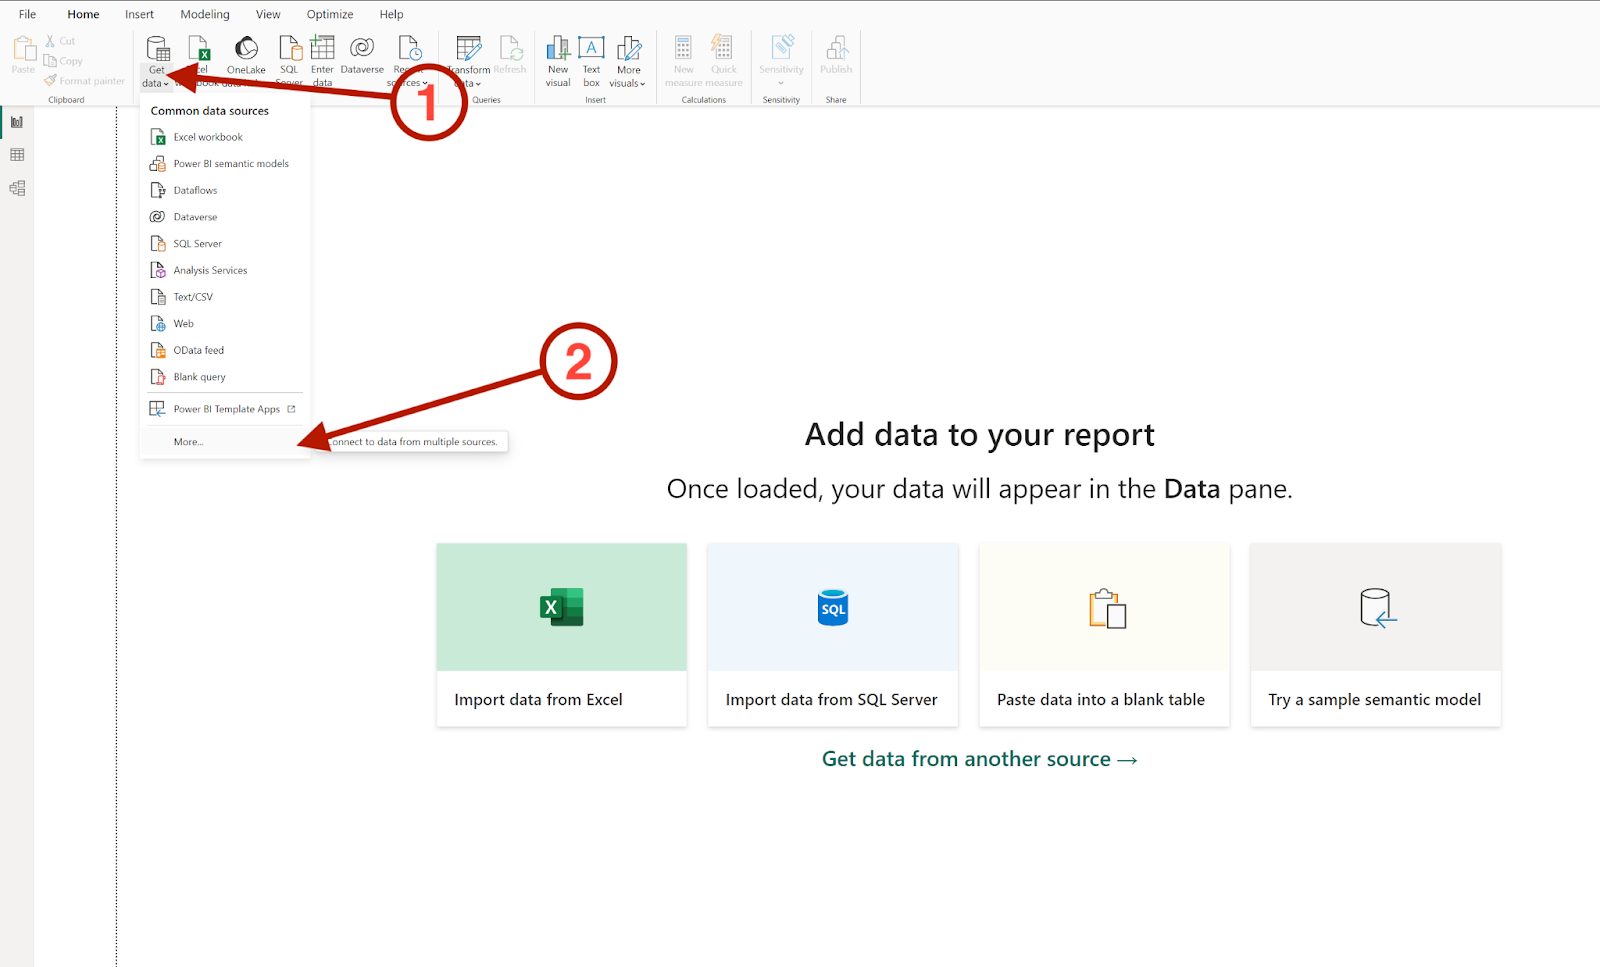
4.1) Click ‘Get data’ in the toolbar.
4.2) If a dropdown appears below it, click ‘More’ in the bottom. If no dropdown appears, but a dialog opens, proceed with step (5).
5) In the dialog that opens:
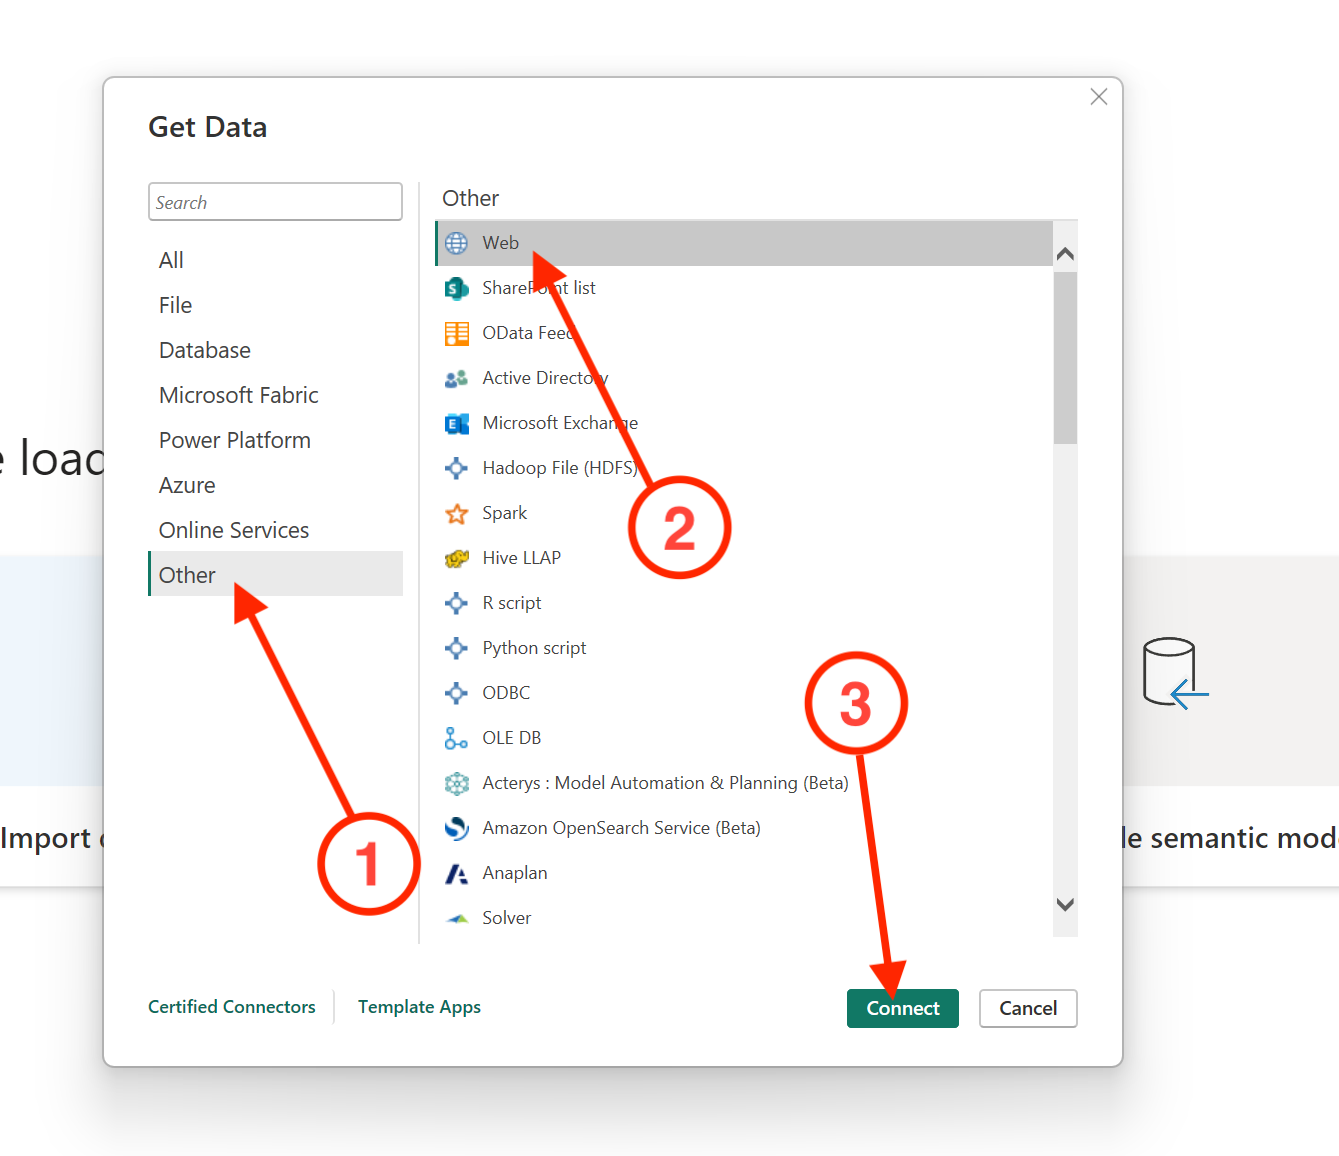
5.1) Click ‘Other’ in the side navigation
5.2) Click ‘Web’ in the list that appears next to it.
5.3) Finally click ‘Connect’ to proceed.
6) Fill out the information about your idea collection and authorization token for the API in the dialog that appears:
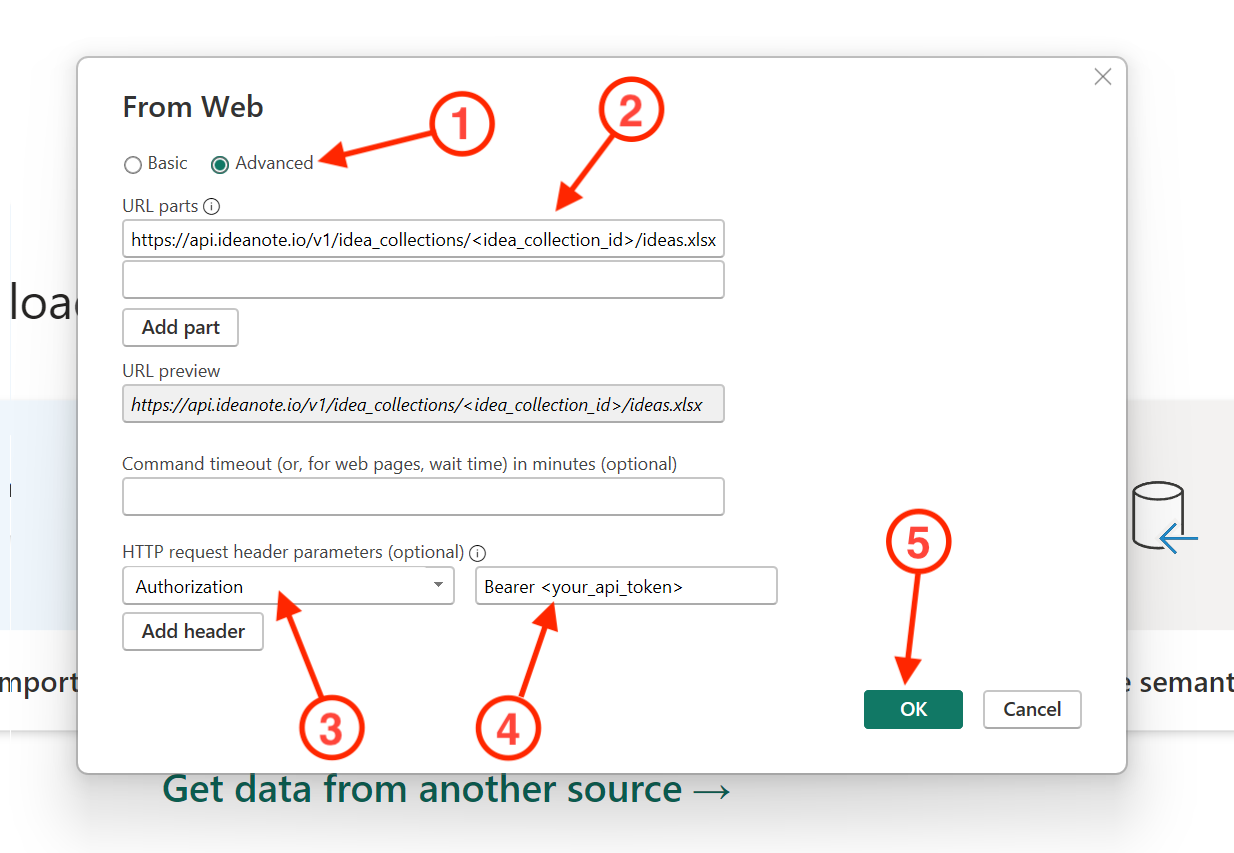
6.1) Click the ‘Advanced’ toggle in the top
6.2) Under the first ‘URL parts’ text field, insert the URL https://api.ideanote.io/v1/idea_collections/<idea_collection_id>/ideas.xlsx, where the <idea_collection_id> part if replaced by the ID of your idea collection you identified in step (2). For example, if the ID was 28, the full URL would look like this: https://api.ideanote.io/v1/idea_collections/28/ideas.xlsx
6.3) Under ‘HTTP Request header parameters (optional)’, add a header named Authorization
6.4) As value for the Authorization header, write:
Bearer <your_api_token>, where <your_api_token> should be replaced by the API token you copied in step (1). For example, if your API-token is a134566b2501f74fb48d5fdcb14347_1711119239305, the value should be Bearer a134566b2501f74fb48d5fdcb14347_1711119239305
6.5) Finally click ‘OK’ to proceed
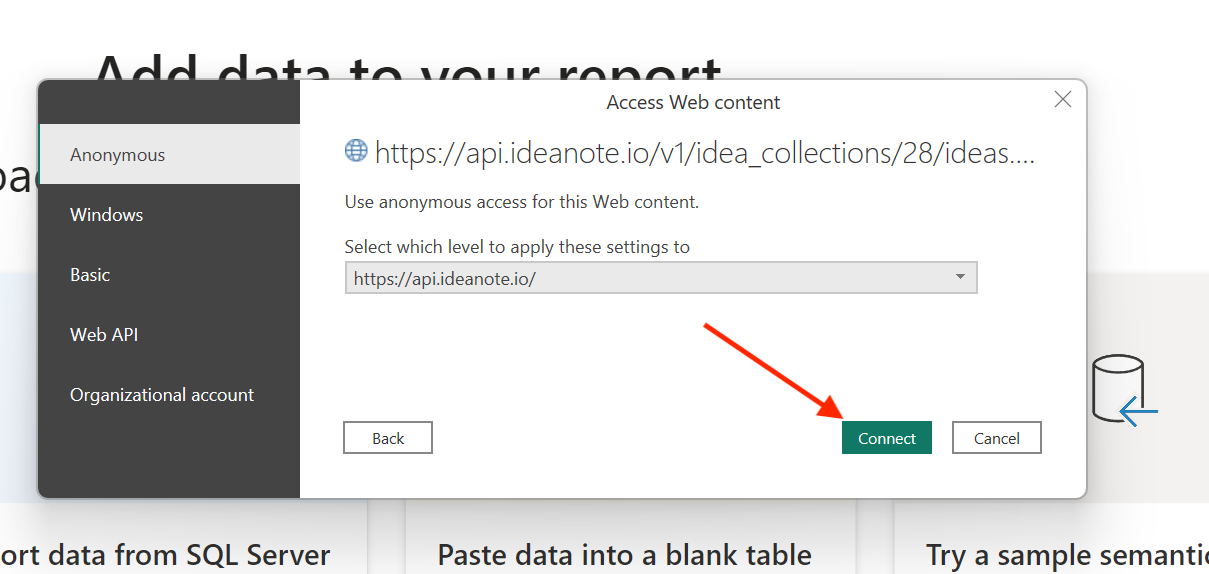
7) Click ‘Connect’ in the dialog that appears next
8) In the ‘Navigator’ dialog that opens:
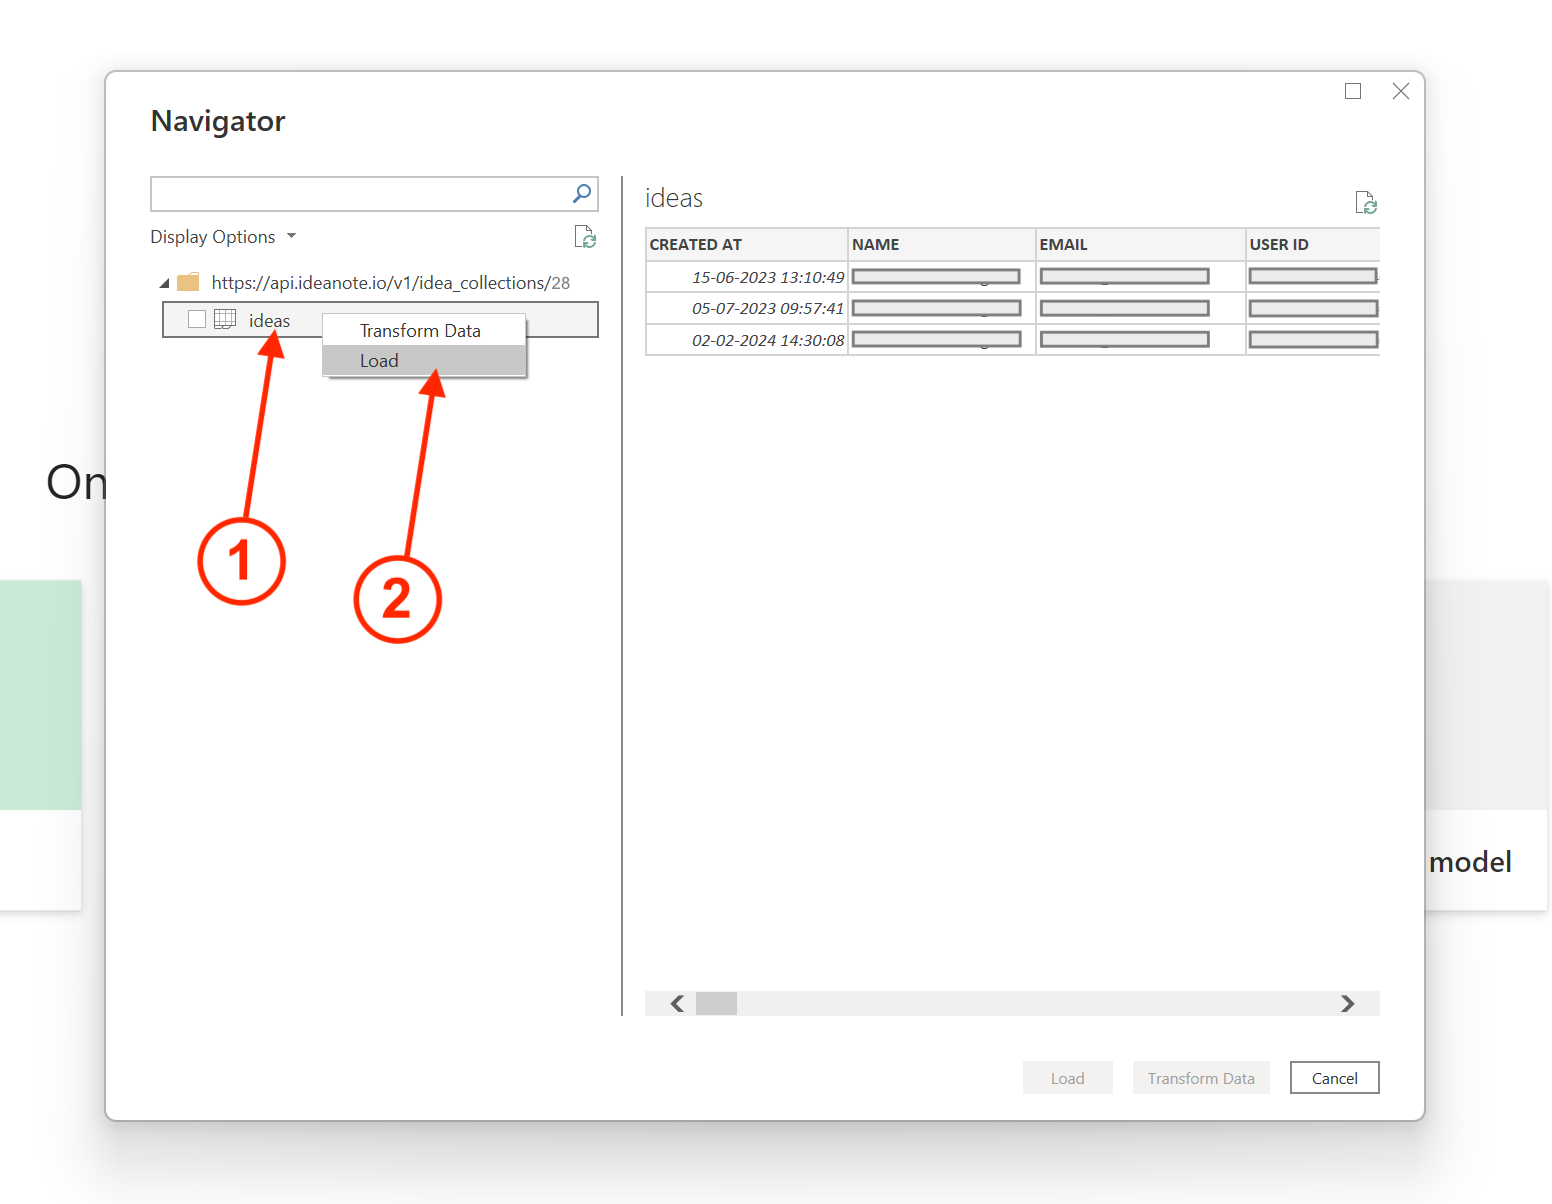
8.1) Right-click ‘ideas’ in the side navigation
8.2) Click ‘Load’
9) You’re now ready to work with your ideas and their activities as a data source
10) You can manually refresh the data at any point in time:
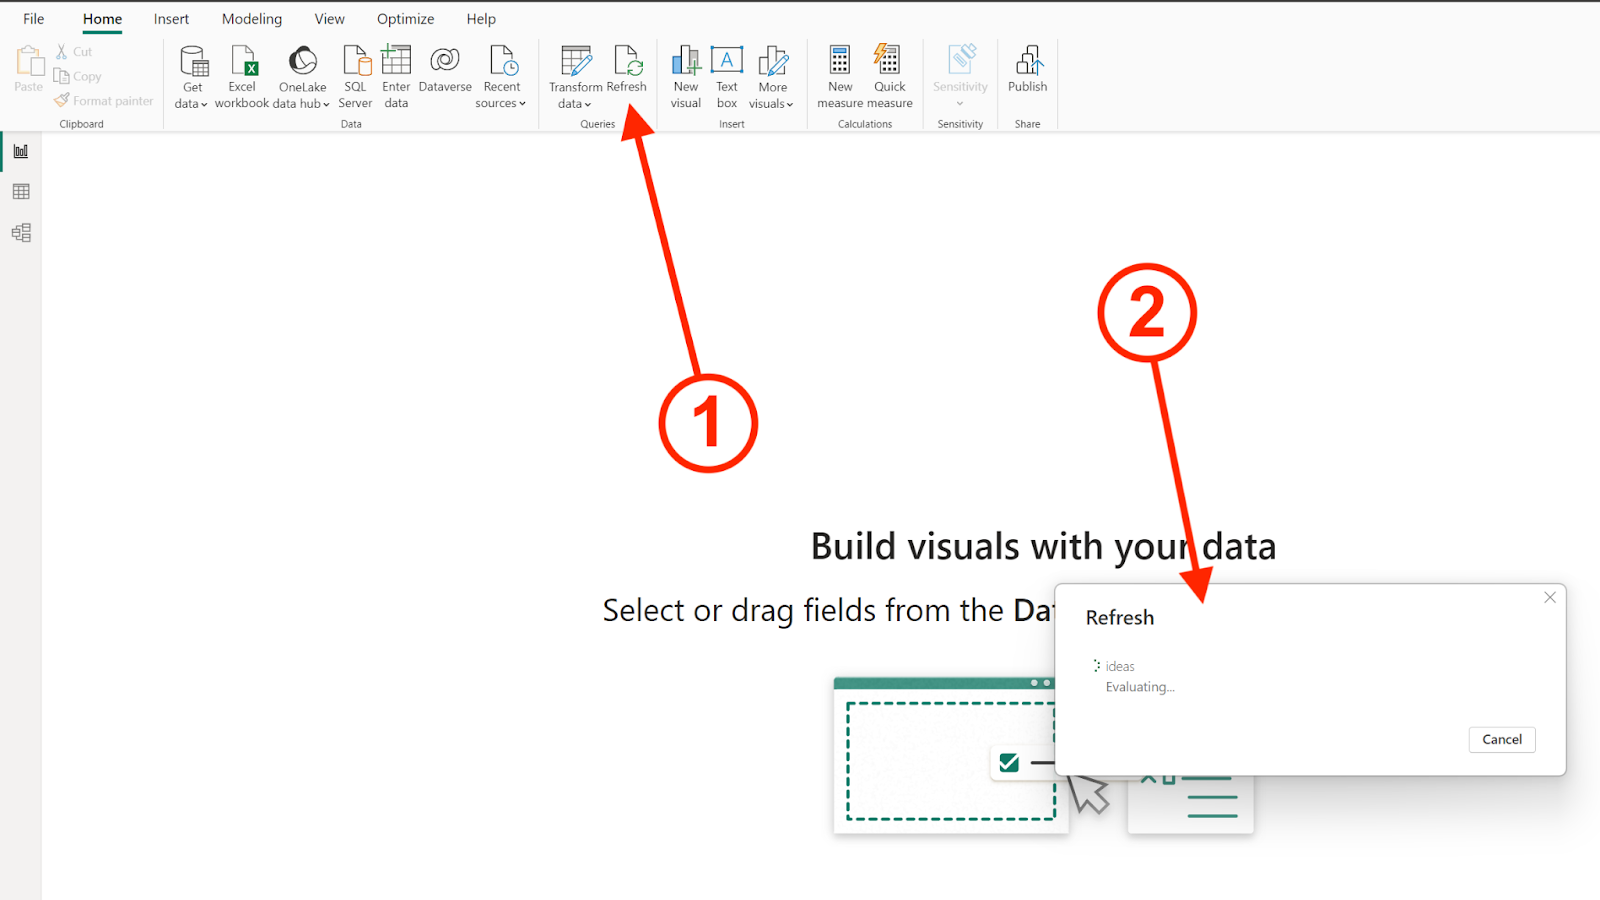
10.1) Clicking ‘Refresh’ in the PowerBI toolbar
10.2) A dialog window will open while PowerBI is fetching new data from the Ideanote API.
10.3) In case your report includes multiple data sources and you only want to refresh the one from Ideanote, you can do so by:
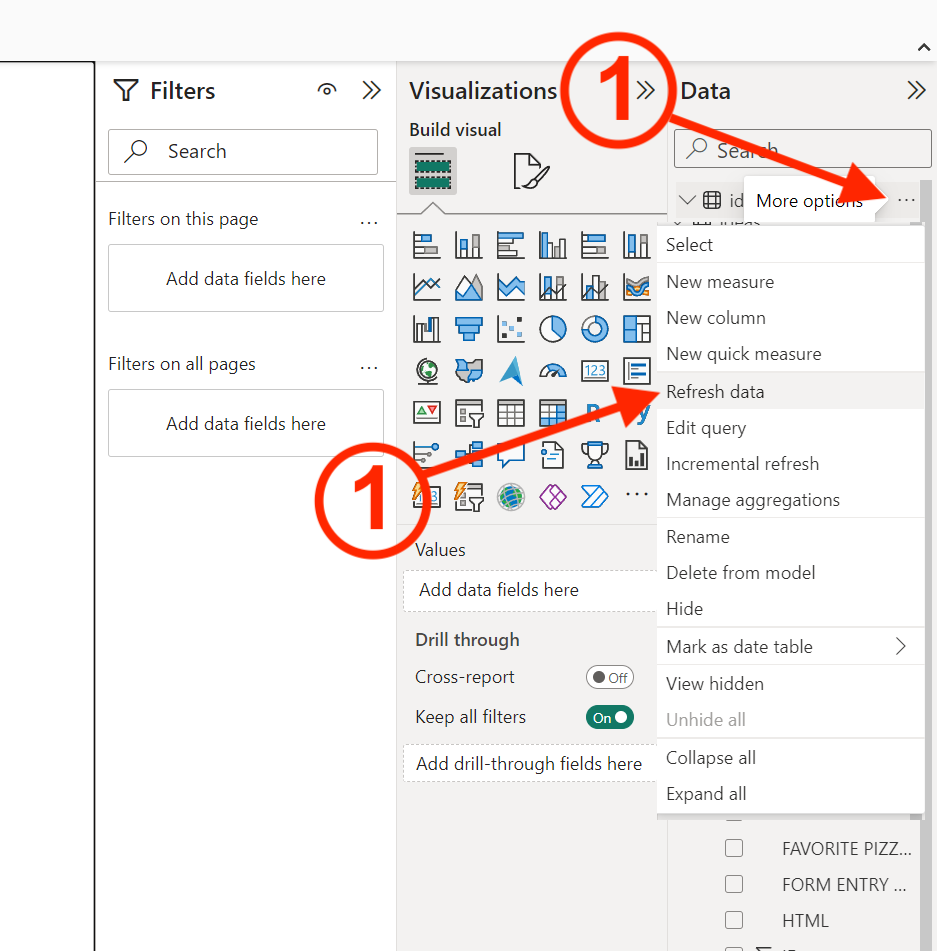
10.3.1) Clicking on the three horizontal dots next to the ‘ideas’ data source in the ‘Data’ side panel
10.3.2) Clicking ‘Refresh data’ in the dropdown that appears below it.
Setting up scheduled incremental refresh of Ideanote data inside PowerBI
You can also schedule automatic incremental data refreshing such that the data from Ideanote inside PowerBI is always up-to-date. To do so, you must first follow the steps outlined above in ‘Setting up Ideanote as a data source inside PowerBI’ to set up an Ideanote data source inside PowerBI. Then you can proceed with the steps below:
1) Before being able to set up Incremental refresh, a strict requirement of PowerBI is that you must first ensure that your report has parameters set up for selecting a date range to sync data within, and associate it with the CREATED AT column inside the ‘ideas’ data source. The date range must include both a start- and end date. Here follows instructions on how to set up such parameters:
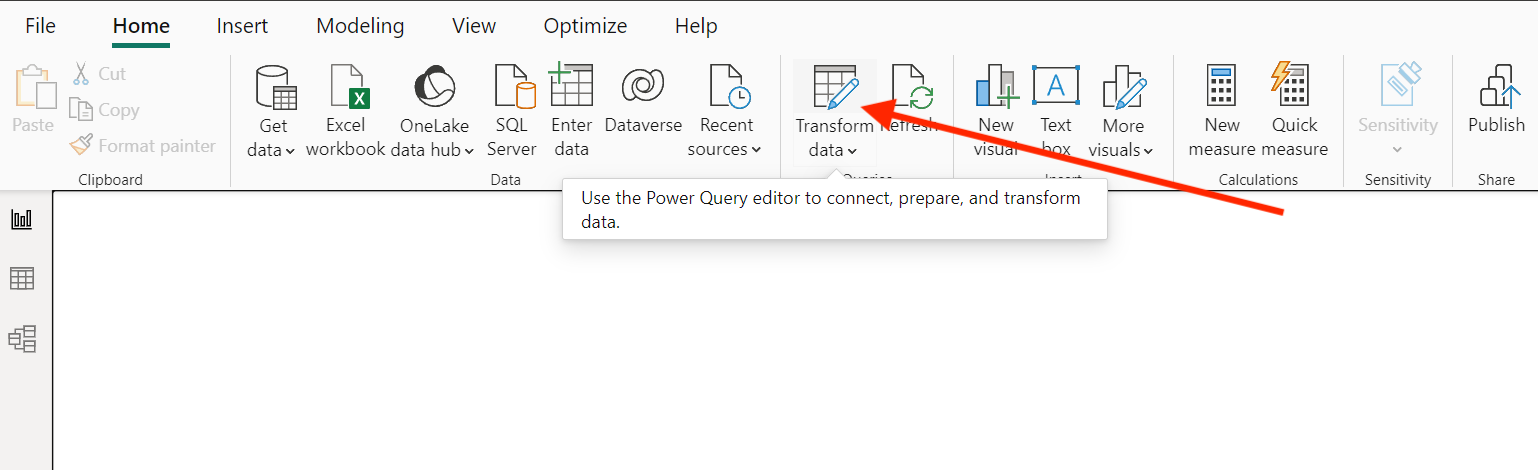
1.1) Click ‘Transform data’ in the toolbar of your report.
1.2) In the Power Query Editor that opens, Click ‘Manage Parameters’ in the toolbar.

1.2.1) Note: If you already have set up parameters for a start and end of a datetime range, you can proceed from step 1.5.3.
1.3) In the Parameters editor, first create the parameter for defining the start range:
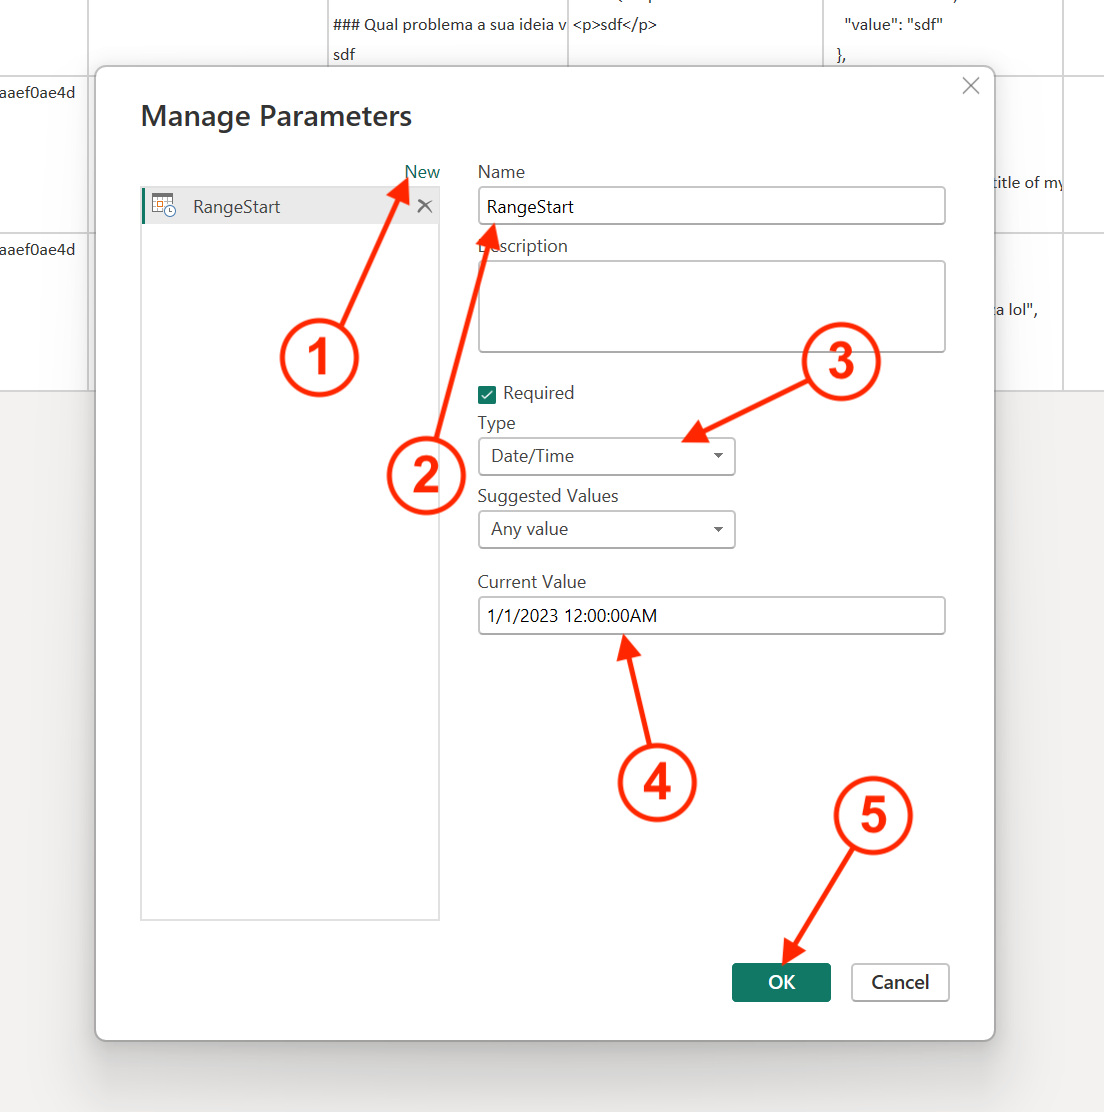
1.3.1) Click ‘New’
1.3.2) Give it a descriptive name, such as ‘RangeStart’
1.3.3) Under ‘Type’, select ‘Date/Time’
1.3.4) Under ‘Current Value’ give it the lowest bound you want to consider for the model. If you want to consider all the ideas you collected, make sure to select a date that is equal to or older than your idea collection or workspace.
1.4) Repeat the steps from 1.3 again to create the end parameter. If you want the end range to be practically infinite, set the end parameter to a date long into the future.
1.5) Finally, click ‘OK’.
1.6) While the Power Query Editor is still open:
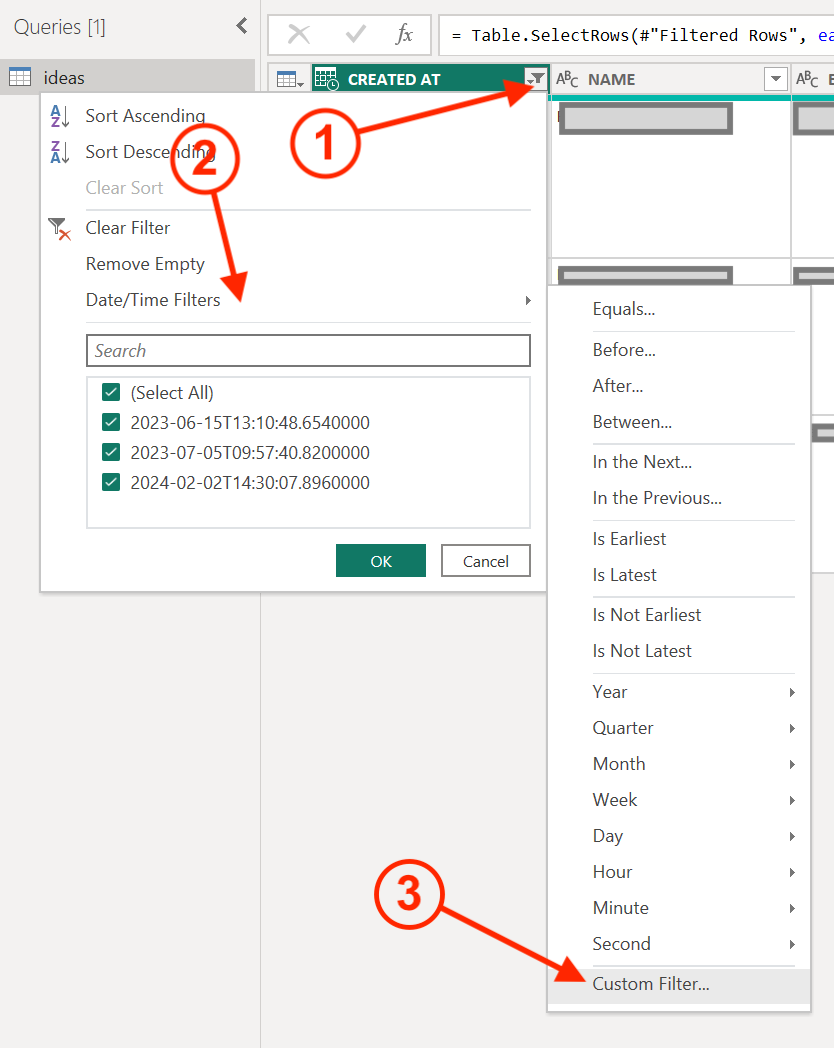
1.6.1) Click the filter icon button on the CREATED AT column (see (1) in the image above).
1.6.2) If ‘Date/Time Filters’ is not visible as an option in the dropdown menu, follow steps 1.6.2.1 and on. If it is, you can safely proceed with 1.6.3:
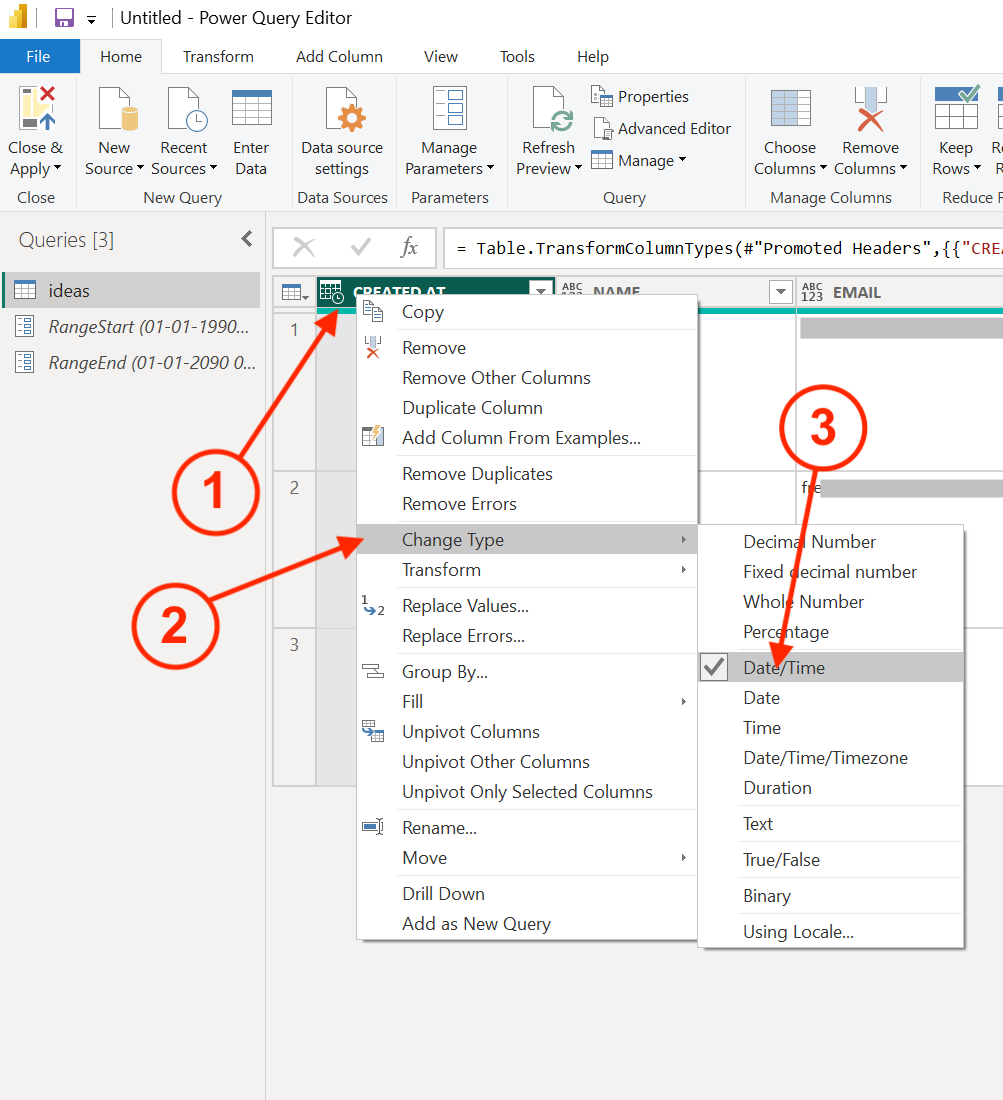
1.6.2.1) Right-click the CREATED AT column.
1.6.2.2) Click ‘Change Type’ in the dropdown that appears.
1.6.2.3) Select ‘Date/Time’ in the dropdown menu next to it
1.6.2.4) Now, click the filter icon button on the CREATED AT column again. If everything is correct, you should see the ‘Date/Time Filters’ option in the dropdown menu.
1.6.2.5) Click ‘Date/Time Filters’ in the dropdown menu that appears
1.6.2.6) Click ‘Custom Filter…’ in the dropdown menu that appears next to it.
1.7) Set up the filter for the start of the range:
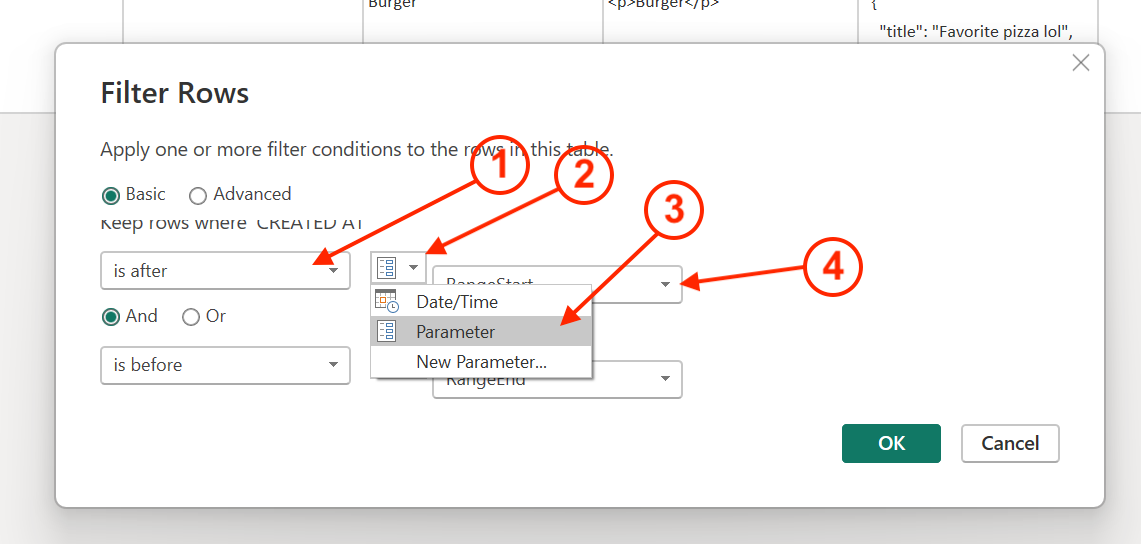
1.7.1) Switch from ‘Equals’ to ‘Is after’ in the first dropdown menu
1.7.3) Click the little icon in the middle, right next to the field where you selected ‘Is after’ (see (2) in the image above).
1.7.4) Choose ‘Parameter’ in the dropdown menu that will appear.
1.7.5) Select ‘RangeStart’ (or whatever you called the parameter) in the dropdown menu next to it (see (4) in the image above).
1.8) Below it, repeat the same steps for setting the end of the date range:
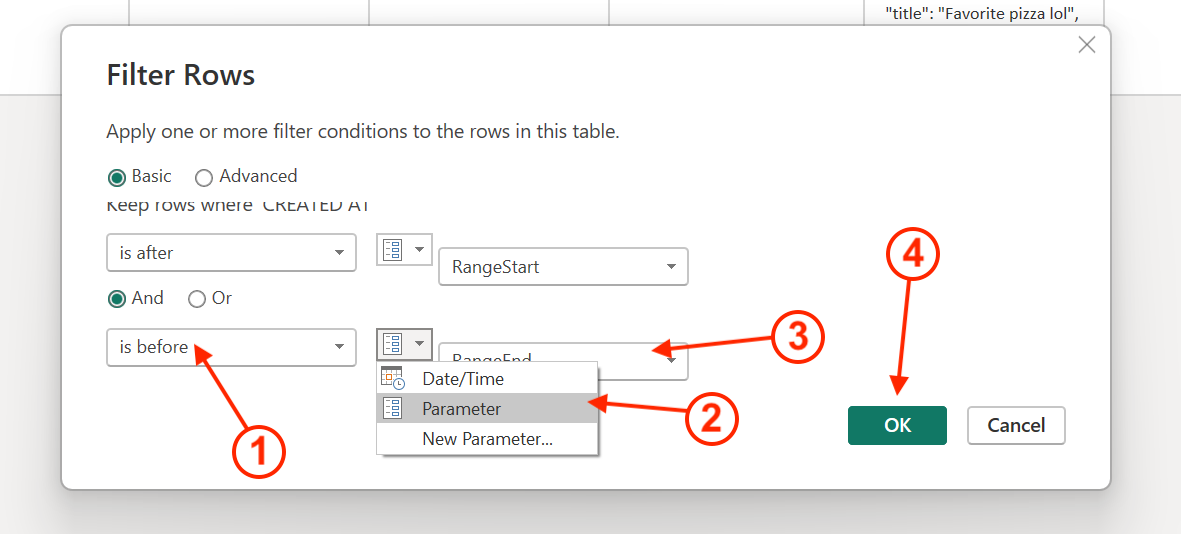
1.8.1) Select ‘Is before’ in the first dropdown menu
1.8.2) Select ‘Parameter’ in the second dropdown menu
1.8.3) Select ‘RangeEnd’ (or whatever you called the parameter) in the third dropdown menu.
1.8.4) Finally, click ‘OK’ to proceed.
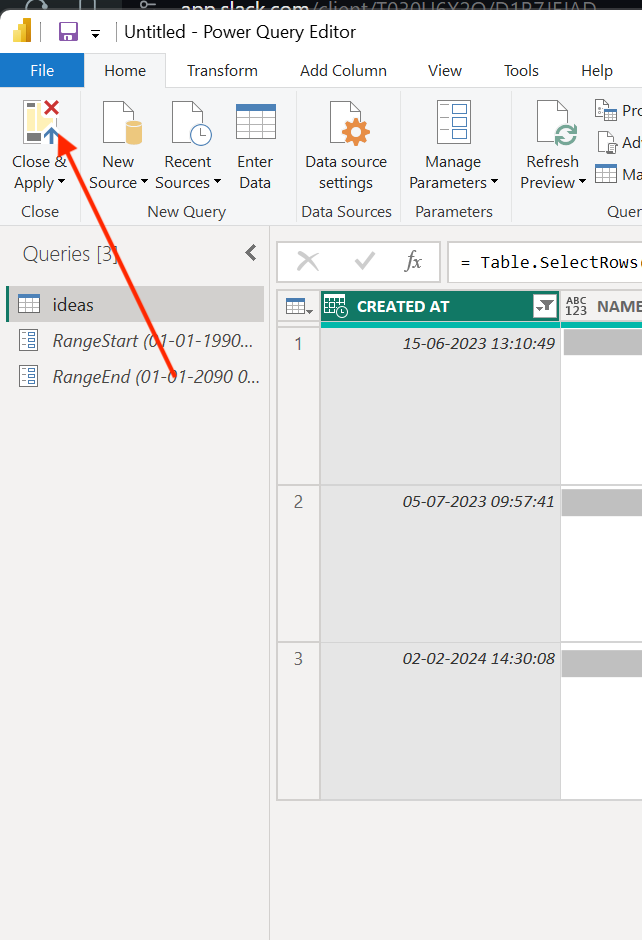
1.9) Now, click ‘Close & Apply’ in the toolbar to save and commit your changes.
1.10) The Power Query Editor will close and take you back to your report. The data source will be refreshed once by PowerBI, and after that you’ll be ready to proceed with Step 2.
2) In the ‘Data’ side panel in PowerBI, identify the ‘ideas’ source.
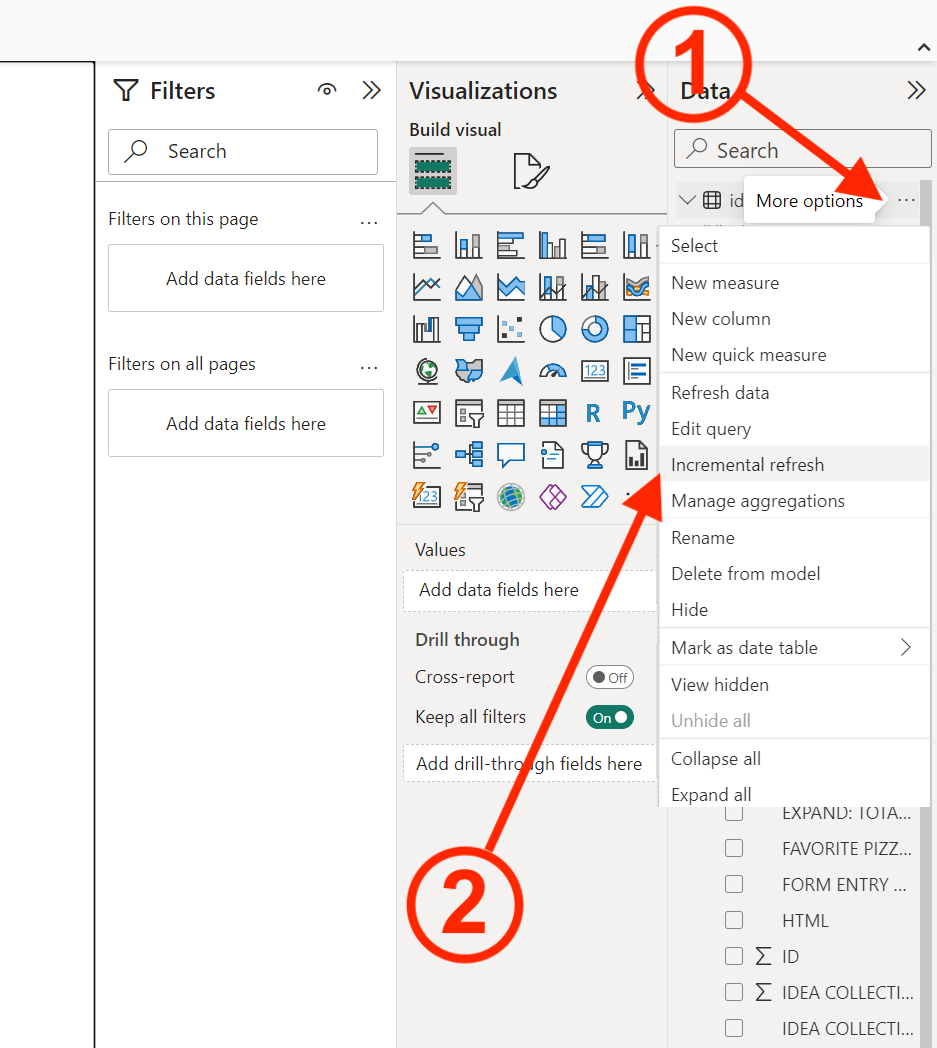
2.1) Click the three horizontal dots next to the ‘ideas’ source.
2.2) Click ‘Incremental refresh’ in the dropdown menu that appears below it.
3) In the dialog that appears:
3.1) Under ‘Select table’, make sure the ‘ideas’ data source is selected
3.2) Make sure ‘Incrementally refresh this table’ is toggled on.
3.2.1) Note: If the ‘Incrementally refresh this table’ toggle is disabled (“grayed-out”), and/or a warning box appears in the top of the screen informing that parameters need to be set up, go back and repeat Step (1) and make sure your start- and end-parameter is correctly associated with the CREATED AT column in the Power Query Editor. Here’s how it may:

3.3) Under ‘Archive data starting’, specify the historical period you want to include in the model. All ideas with CREATED AT dates in this period will be loaded into the model, unless other filters apply. See this link for more information.
3.4) Under ‘Incrementally refresh data starting’, specify the refresh period. All ideas with CREATED AT dates in this period will be refreshed in the model each time a manual or scheduled refresh operation is performed by the Power BI service. See this link for more information.
3.5) Finally, click ‘Apply’.
4) We recommend that you perform one last manual refresh following step 10 in the ‘Setting up Ideanote as a data source inside PowerBI’ guide above to make sure everything looks correct.
5) You have now set up Incremental Refresh!
.svg)
